[2023.5.24 추가] - 3기 백인턴 분들을 위해 하단에 간단하게 작성한 부분이 있으니 참고해주세요!
스프링 어린이 + 제대로 된 프로젝트가 처음이었던 나는 어느 날 프론트에게 CORS 에러가 나서 해결해주실 수 있냐고 문의를 받았다.

시큐리티 부분도 소화하기 어려웠는데 CORS 문제까지 있다니! 다행히 같이 모각코하던 백엔드 인턴분께서 좋은 블로그를 찾아주셔서 해결할 수 있었다.
신기하게 그 작성자님이 학교 선배님이셨다는 놀라운 이야기...최고최고!!! 덕분에 해결했습니다ㅜㅜ 감사합니다!!! 👍👍👍
https://myunji.tistory.com/515
[Spring] Spring Security PostMan에서 잘 되던 api가 프론트에서 cors 에러를 띄운다면
현재 프론트로 React를 쓰고 있다. 스프링은 8080 포트를 사용하고 리액트는...3000이던가 3001이던가 아무튼 둘 중 하나였던 것 같다. 이게 맞지 않아서 cors가 뜨는데, 이를 해결하기 위해 CorsFilter를
myunji.tistory.com
CORS는 Cross Origin Resource Sharing의 약자로 도메인 및 포트가 다른 서버로 클라이언트가 요청했을 때 브라우저가 보안상의 이유로 API를 차단하는 문제이다. 로컬에서 클라이언트는 3000 포트로 서버는 8080 포트로 서버를 띄웠을때 또는 로컬 서버에서 다른 서버로 호출할 때 발생하게 된 것이다. 이를 해결하기 위해서는 CorsFilter를 정의하여 해결했다.
✔️해결 방법
(1) JWT할 때 만들어두었던 config파일에 다음의 코드를 추가해준다.
@Bean
	public CorsConfigurationSource corsConfigurationSource() {
		CorsConfiguration configuration = new CorsConfiguration();
		configuration.addAllowedOrigin("https://lakku-lakku.netlify.app");
		configuration.addAllowedHeader("*");
		configuration.addAllowedMethod("*");
		configuration.setAllowCredentials(true);
		UrlBasedCorsConfigurationSource source = new UrlBasedCorsConfigurationSource();
		source.registerCorsConfiguration("/**", configuration);
		return source;
	}
(2)원래 있던 함수에 부분적으로 추가해준다.
@Bean
	public SecurityFilterChain filterChain(HttpSecurity http) throws Exception {
		http
				.cors().configurationSource(corsConfigurationSource())//이 부분 추가
				.and()
					.httpBasic().disable()//이 부분 추가
					.csrf().disable()
					.sessionManagement().sessionCreationPolicy(SessionCreationPolicy.STATELESS)
				.and()
					.exceptionHandling()
					.authenticationEntryPoint(customAuthenticationEntryPoint)
				.and()
					.authorizeRequests()
					.requestMatchers(CorsUtils::isPreFlightRequest).permitAll()//이 부분 추가
					.antMatchers("/api/v1/users/signup/**", "/api/v1/users/login", "/api/v1/users/re-issue").permitAll()
				.anyRequest().authenticated()
				.and()
				.addFilterBefore(new JwtAuthenticationFilter(jwtProvider), UsernamePasswordAuthenticationFilter.class);
		return http.build();
	}
[추가 부분에 대한 설명]
.cors().configurationSource(corsConfigurationSource())=> 위에서 정의한 cors 정책의 설정파일로 등록
.httpBasic().disable()=> Http basic Auth 기반으로 로그인 인증창이 뜸. disable 시에 인증창 뜨지 않음.
.requestMatchers(CorsUtils::isPreFlightRequest).permitAll()=> Preflight request에 대해, 인증을 하지 않고 요청을 모두 허용
✔️[최종 코드]
package com.efub.lakkulakku.global.config;

import com.efub.lakkulakku.global.config.jwt.JwtAuthenticationFilter;
import com.efub.lakkulakku.global.config.jwt.JwtProvider;
import com.efub.lakkulakku.global.exception.jwt.CustomAuthenticationEntryPoint;
import lombok.RequiredArgsConstructor;
import org.springframework.context.annotation.Bean;
import org.springframework.context.annotation.Configuration;
import org.springframework.security.config.annotation.web.builders.HttpSecurity;
import org.springframework.security.config.annotation.web.configuration.EnableWebSecurity;
import org.springframework.security.config.http.SessionCreationPolicy;
import org.springframework.security.crypto.factory.PasswordEncoderFactories;
import org.springframework.security.crypto.password.PasswordEncoder;
import org.springframework.security.web.SecurityFilterChain;
import org.springframework.security.web.authentication.UsernamePasswordAuthenticationFilter;
import org.springframework.web.cors.CorsConfiguration;
import org.springframework.web.cors.CorsConfigurationSource;
import org.springframework.web.cors.CorsUtils;
import org.springframework.web.cors.UrlBasedCorsConfigurationSource;

@Configuration
@EnableWebSecurity
@RequiredArgsConstructor
public class AppConfig {

   private final JwtProvider jwtProvider;
   private final CustomAuthenticationEntryPoint customAuthenticationEntryPoint;

   @Bean
   public PasswordEncoder passwordEncoder() {
      return PasswordEncoderFactories.createDelegatingPasswordEncoder();
   }

   @Bean
   public CorsConfigurationSource corsConfigurationSource() {
      CorsConfiguration configuration = new CorsConfiguration();
      configuration.addAllowedOrigin("https://lakku-lakku.netlify.app");
      configuration.addAllowedHeader("*");
      configuration.addAllowedMethod("*");
      configuration.setAllowCredentials(true);
      UrlBasedCorsConfigurationSource source = new UrlBasedCorsConfigurationSource();
      source.registerCorsConfiguration("/**", configuration);
      return source;
   }
   @Bean
   public SecurityFilterChain filterChain(HttpSecurity http) throws Exception {
      http
            .cors().configurationSource(corsConfigurationSource())
            .and()
               .httpBasic().disable()
               .csrf().disable()
               .sessionManagement().sessionCreationPolicy(SessionCreationPolicy.STATELESS)
            .and()
               .exceptionHandling()
               .authenticationEntryPoint(customAuthenticationEntryPoint)
            .and()
               .authorizeRequests()
               .requestMatchers(CorsUtils::isPreFlightRequest).permitAll()
               .antMatchers("/api/v1/users/signup/**", "/api/v1/users/login", "/api/v1/users/re-issue").permitAll()
            .anyRequest().authenticated()
            .and()
            .addFilterBefore(new JwtAuthenticationFilter(jwtProvider), UsernamePasswordAuthenticationFilter.class);
      return http.build();
   }
}
지금부터는 최종 코드까지의 과정을 적어보려고 한다.
[테스트 문제]
일단, localhost:3000으로 어떻게 실행하지? 라고 생각을 했다. 그래서 프론트엔드는 어떻게 요청을 보내는 지부터 찾아봤다. 하지만 그럴 필요 없이 바로 테스트해볼 수 있는 방법이 있었다.
다음 링크를 참고하면 된다.
cURL 명령어로 하는 초간단 CORS 테스트 | Popit
요즘은 굳이 MSA Microservices Architecture 가 아니더라도 프론트엔드 Front-end 와 백엔드 Back-end 를 구분하여 프론트 엔드는 Anguler나 React로 개발하고 백엔드는 프론트엔드에서 사용할 API를 제공하는
www.popit.kr
[ configuration.addAllowedOrigin("*"); 오류 문제]
우리는 localhost:3000을 허용하는 문제이지만 *을 사용하여 혹시 더 광범위하게 허용해도 되지 않을까? 라는 생각에 저렇게 코드를 작성했는데 오류가 났다.
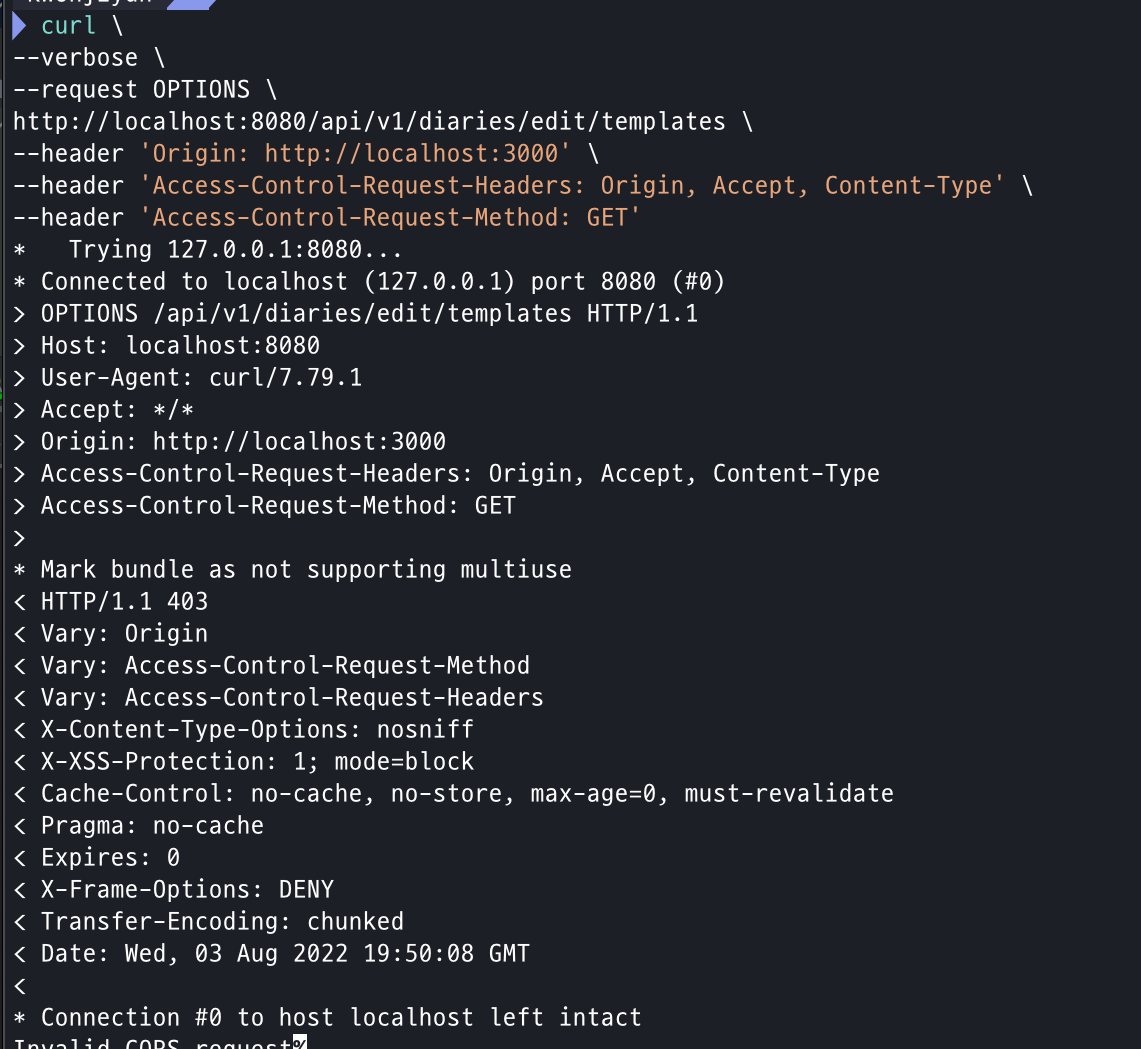

로그창을 보니 localhost:3000이 통과가 * 형식이 아니라서 통과가 안되었다는 오류 메시지였다. 그래서 다음과 같이 변경하였더니 최종적으로 200 응답 뜨게 하기 완료! 했다.
[이전 버전]
configuration.addAllowedOrigin("*");
[변경 버전] -> 나중에는 배포된 링크를 적어두기!! (배포한 후에도 필요한 줄 모르고 변경을 안했다가 배포 후에 에러를 만나게 되었다... 죄송합니다..)
configuration.addAllowedOrigin("<http://localhost:3000>");

우와!!! 이제 에러 안난다!!! 테스트 결과를 확인하고 바로 메인에 푸쉬했다.


토이프로젝트를 하시는 백인턴분들을 위한 파트!
아직 스프링시큐리티를 사용하지 않는 인턴분들은 이 부분을 따라하시면 됩니다!
프론트 분께서 cors 에러가 난다고 말해주시면(혹은 아래와 같이 설정을 안해주면 100퍼 에러니까 미리 미리 추가해두시면 좋습니다) 다음과 같이 하나의 파일을 생성하시면 됩니다!
global -> config 폴더에 "WebConfig" 파일을 아래의 사진과 같이 생성하지면 됩니다.
이때, 프론트분들이 배포하시기 전이라면 "http://localhost:3000"만 추가해두시고 프론트 배포 후 프론트 배포 링크를 추가하시면 됩니다!

추가 후 위의 curl 명령어를 사용하셔서 200 혹은 201 이 뜨는지(서버와 연결이 되는지) 확인하시면 됩니다! 다음 링크는 윈도우에서 curl 명령어를 사용하는 방법입니다! 참고해주세요! https://egs41.tistory.com/entry/Windows-10%EC%97%90%EC%84%9C-curl-%EB%AA%85%EB%A0%B9%EC%96%B4-%EC%82%AC%EC%9A%A9%ED%95%98%EB%8A%94-%EB%B0%A9%EB%B2%95
'프로젝트 > 라꾸라꾸 프로젝트' 카테고리의 다른 글
| [보안] 패스워드 보안 지침 (0) | 2022.09.12 |
|---|---|
| 라꾸라꾸 프로젝트를 마치면서 (0) | 2022.08.08 |
| [예외처리] 방법 소개와 프로젝트 적용 (0) | 2022.08.08 |
| [JWT] Access Token 재발급 문제 (0) | 2022.08.02 |
| 🌕라꾸라꾸(LakkuLakku) 프로젝트 시작 (0) | 2022.08.02 |


