스프링 시큐리티에 대해서 알아보기 전 간단하게 개념 확인하겠습니다!
🎨 What is Servlet?
- 웹 기반의 요청에 대해 동적으로 처리해주는 역할입니다.
- 해당 URL에 기반한 HTTPservletRequest를 생성하고 response 결과를 전송합니다.
- request 객체에 있는 정보들을 꺼내서 사용, response 객체에 정보를 편리하게 입력
🎨 What is Servlet Container?
- 서블릿은 요청을 받거나 내보낼 때, 자신이 알아서 하는 것이 아니라 서블릿을 실행시키는 주체인 서블릿 컨테이너라는 것을 이용합니다.
- 즉, Servlet을 관리한다는 Servlet Container는 어떤 요청에 대해 어떤 Servlet을 실행할 것인지 제어하는 것이죠.
- 더 쉽게 말하면,, 서블릿이 웹서버와 통신할 수 있도록 해줍니다.
🎨 그렇다면, Dispatcher Servlet은 무엇인가요?
- 클라이언트가 요청을 주면, Servlet Container가 요청을 받는데요. 이때 제일 앞에서 서버로 들어오는 모든 요청을 처리하는Front Controller라는 것을 Spring에서 정의하였고, 이를 Dispatcher Servlet이라고 합니다.
스프링 시큐리티
스프링 시큐리티의 내부에는 여러 개의 필터가 Filter Chain이라는 구조로 Request를 처리하게 됩니다.
그리고 보안과 관련해서 체계적으로 많은 옵션을 제공해주기 때문에 개발자 입장에서는 일일이 보안관련 로직을 작성하지 않아도 된다는 장점이 있습니다
사용자가 request를 보내면 → 컨테이너는 해당 URL에 기반한 HTTPservletRequest를 생성할 수 있는 servlet과 filter를 포함한 filter chain을 만듭니다.
Filter는 Dispatcher Servlet으로 가기 전에 적용되므로 가장 먼저 URL 요청을 받습니다.(웹 컨테이너에서 관리)
Client (request) → Filter → DispatcherServlet → Interceptor → Controller(handler)
다음으로는 전반적인 과정에 대해서 설명하겠습니다.
먼저 크게 1) 초기화 과정과 2) 인증 인가 과정으로 나눌 수 있습니다.
일단 여기서 초기화 과정을 간략하게 보면 시큐리티 config가 선언이 되고 필터를 생성하여 보안 요청에 대한 작업들을 하는 것을 볼 수 있습니다.
먼저 대략적으로 살펴보면 다음과 같습니다.
- 순서
- 초기화
- SecurityConfig 선언
- 선언된 대로 HttpSecurity가 filter들을 생성
- WebSecurity가 HttpSecurity들의 filter목록을 받아 FilterChainProxy로 전달
- DelegatingFilterProxy가 초기화될 때 springSecurityFilterChain이라는 빈을 찾아서 요청을 위임하게됨
- springSecurityFilterChain빈은 FilterChainProxy
- 인증 인가 과정 : 로그인 시도 - 성공
- SecurityContextPersistenceFilter
- SecurityContext가 있는지 확인
- 있으면 가져오고 없으면 만들어줌
- LogoutFilter : 로그아웃 요청이 아니므로 패스
- UsernamePasswordAuthenticationFilter
- 인증처리하고 SecurityContext에 인증객체 저장
- AuthenticationManager, AuthenticationProvider, UserDetailsService
- 인증에 성공하면 SessionManagementFilter에 선언된 기능을 사용해서 후속처리
- LoginSuccessHandler에 따라 동작하게됨
- SecurityContextPersistenceFilter
- 이 전에 로그인한 정보를 가져옴
- LogoutFilter : 로그아웃 요청이 아니므로 패스
- UsernamePasswordAuthenticationFilter : 인증 요청이 아니므로 패스
- ConcurrentSessionFilter : 동시세션제어가 아니므로 패스
- RememverMeAuthenticationFilter : remember-me cookie 확인
- AnonymousAuthenticationFilter : 인증사용자이므로 패스
- SessionManagementFilter : 세션이 있고 세션에 인증객체도 있기 때문에 패스
- ExceptionTranslationFilter : 인가예외 처리
- FilterSecurityInterceptor : 인가처리를 하는 필터로 예외발생시킴
- SecurityContextPersistenceFilter
- 초기화
이에 대해서 자세히 살펴 보겠습니다.
🎨 1. 초기화
초기화 부분을 구성하고 있는 3가지의 역할에 대해서 설명드리겠습니다.
DelegatingFilterProxy
스프링은 DelegatingFilterProxy라는 필터 구현체를 제공하는데, 이는 Servlet Container의 생명 주기와 스프링의 ApplicationContext사이를 연결해주는 역할을 합니다.
- ApplicationContext에서 springSecurityFilterChain을 찾아 보안처리 위임합니다.
FilterChainProxy
- FilterChainProxy는 스프링 시큐리티에서 제공하는 특별한 필터입니다.
- springSecurityFilterChain이름으로 생성되는 스프링 빈이며 DelegatingFilterProxy로부터 요청을 위임받고 실제 보안 처리를 합니다.
- 스프링 시큐리티가 초기화될 때 스프링 시큐리티가 생성하는 필터와 사용자가 설정 클래스를 통해 생성한 필터들의 체인을 순서대로 호출하여 사용자의 요청을 각각 필터에 전달합니다.
- 마지막 필터까지 예외가 발생하지 않으면 인증 통과된것을 의미합니다.
SecurityFilterChain
위에서 본 FilterChainProxy에서 사용자의 요청에 맞는 필터들을 결정하기 위해 SecurityFilterChain가 사용됩니다.
- 개별 SecurityFilterChain은 Filters(필터정보)와 RequestMatcher(요청정보)를 갖습니다.
예시로, 제가 참여했던 프로젝트 "라꾸라꾸"의 필터 체인을 통해 살펴보자면 다음과 같습니다.
@Bean
	public SecurityFilterChain filterChain(HttpSecurity http) throws Exception {
		http
				.cors().configurationSource(corsConfigurationSource())
//cors 정책 설정 -> 여기서 프론트엔드와 CORS에러를 해결한 부분 -> localhost:3000 허용하여 해결
				.and()
					.httpBasic().disable()
					.csrf().disable()
//disable 하는 이유 : spring security 문서에서는 Non-Browser Clients만을 위한 사용이라면, csrf를 disable하는 것을 권고한다.
					.sessionManagement().sessionCreationPolicy(SessionCreationPolicy.STATELESS)
//JWT를 사용하기 때문에 세션의 별도의 저장소를 사용하지 않는 Stateless(무상태성)하다는 것
				.and()
					.exceptionHandling()
					.authenticationEntryPoint(customAuthenticationEntryPoint)
//토큰 관련 예외에 대한 처리를 위해 CustomAuthenticationEntryPoint를 작성한다. -> 필터 단계에서 발생한 예외를 처리
				.and()
					.authorizeRequests()
					.requestMatchers(CorsUtils::isPreFlightRequest).permitAll()
					.antMatchers("/api/v1/users/signup/**", "/api/v1/users/login", "/api/v1/users/re-issue", "/api/v1/settings", "/api/v1/users/certification/**").permitAll()
				.anyRequest().authenticated() // 이를 제외한 url의 요청이 들어올 경우 토큰이 필요하다는 의미입니다.
				.and()
				.addFilterBefore(new JwtAuthenticationFilter(jwtProvider), UsernamePasswordAuthenticationFilter.class);
//CustomFilter를 만들어 UsernamePasswordAuthenticationFilter보다 먼저 걸리도록 설정 (addFilterBefore)
		return http.build();
	}
- authorizeRequests
- URL 별 권한 관리를 설정하는 옵션의 시작점이다.
- authorizeRequests가 선언되어야만 andMatchers 옵션을 사용할 수 있다.
- antMatchers
- 권한 관리 대상을 지정하는 옵션이다.
- URL, HTTP 메소드 별로 관리가 가능하다.
- 지정된 URL 들은 permitAll() 옵션을 통해 전체 열람 권한을 주었다.
- anyRequest
- 설정된 값들 이외 나머지 URL들을 나타낸다.
- 여기서는 authenticated()을 추가하여, 나머지 URL 들은 모두 인증된 사용자(=로그인 한 사용자)들에게만 허용한다.
여기서 주의할 점은 필터는 downstream Filter에만 영향을 미치므로 이므로 필터의 호출 순서가 중요하다는 것입니다.
다음으로는 인증 인가 과정이며 다음의 개념들을 설명하겠습니다.
🎨 2. 인증 인가
인증을 위한 AuthenticationManager
- Authentication?
- 사용자가 누구인지 증명하는 것
- 인증 결과는 SecurityContext에 저장되어 전역적으로 참조할 수 있다.
- SpringSecurity에서는 interface이며 그 구현체를 인증정보를 전달하는 객체로 사용한다.
필터의 핵심적인 동작은 AuthenticatoinManager를 통해서 인증(Authentication)이라는 타입의 객체로 작업을 하게 된다.
- Authentication 객체가 포함하는 정보는 그림을 보시면 알 수 있듯이 다음과 같은 정보들을 저장합니다.
1. principal : 사용자 아이디 혹은 User 객체를 저장
2. credentials : 사용자 비밀번호
3. authorities : 인증된 사용자의 권한 목록
4. details : 인증 부가 정보
5. Authenticated : 인증 여부
2. SecurityContext에 유저의 정보가 저장되기 까지의 과정을 설명하면
1. UsernamePasswordAuthenticationFilter에서 Authentication 객체 생성

2. 이 때 Authentication principal은 username, credentials는 password(UsernamePasswordAuthenticationToken은 Authentication 구현체)

3. Authentication 객체 AuthenticationManager로 전달
3-1. 이때, 실패하면 exception 성공하면 객체를 다시 전달

4. 인증 후 인증객체를 갱신 : principal은 UserDetails, credentials는 null
4-1. User + Authorities로 같이 합쳐서 저장한다.

5. 인증정보를 SecurityContextHolder(ThreadLocal)에 저장 -> 전역적으로 관리 가능
다음으로 로그인한 유저 정보를 가져오는 과정에 대해서 설명하겠습니다.
- 한편, UserDetailService에는 loadUserByUsername() 이라는 하나의 메서드를 가지고 있습니다.
- 이 메서드의 리턴타입은 UserDetails라는 타입인데 이를 통해 유저 정보를 알아낼 수 있습니다. → 이를 @AuthenticationPrincipal를 통해 어노테이션으로 가져올 수 있습니다.
- 라꾸라꾸(필자가 진행한 프로젝트)에서는 이 어노테이션을 가지고 @AuthUsers 어노테이션이라는 이름으로 커스텀했습니다. 그 이유는
- • JwtAuthentication에 바인딩을 해야하지만 AnonymousAuthenticationToken 객체의 principal은 String타입의 “anonymousUser” 이므로 정상 바인딩할 수 없어 null로 남음 → NullPointerException 발생하기 떄문입니다.
- 라꾸라꾸(필자가 진행한 프로젝트)에서는 이 어노테이션을 가지고 @AuthUsers 어노테이션이라는 이름으로 커스텀했습니다. 그 이유는
다음 코드를 통해 사용자가 준 토큰안에 사용자의 정보가 암호화되어 저장되어있는데 그 토큰의 주인 email을 찾아서 user정보를 가져오는 것을 볼 수 있습니다.

인증 흐름 이해 AuthenticationFlow
인증 흐름
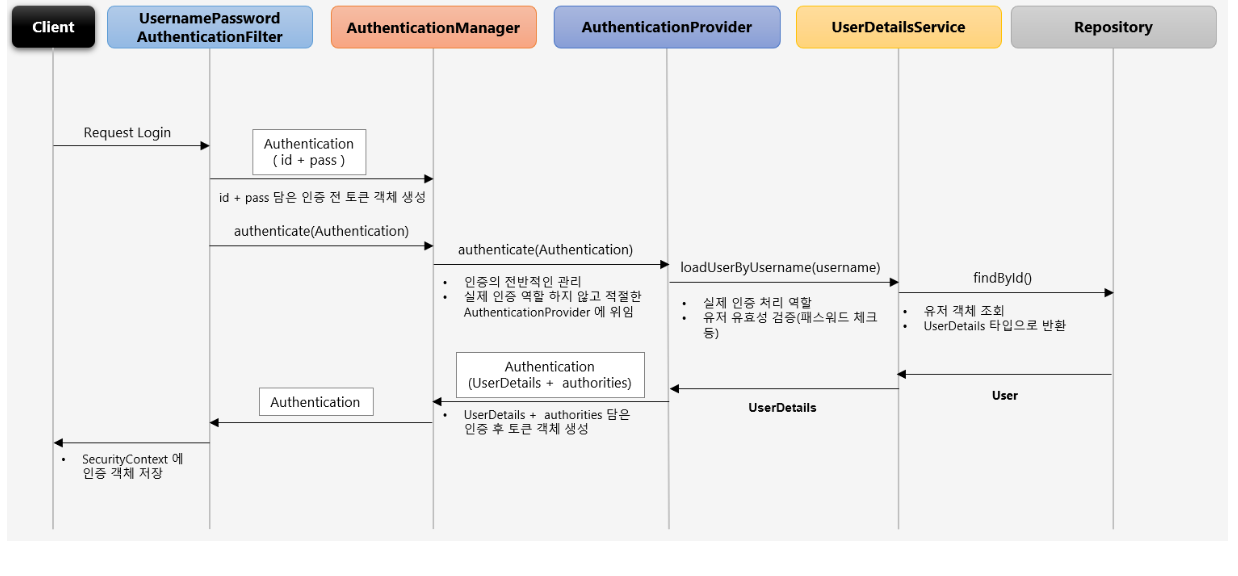
- UsernamePasswordAuthenticationFilter : 매니저로부터 받은 인증객체 SecurityContext에 저장 (AbstractAuthenticationProcessingFilter.successfulAuthentication)
- AuthenticationManager : 인증의 전반적인 관리(위임, 토큰 객체 생성 등), 실제 인증 역할은 AuthenticationProvider에 위임
- AuthenticationProvider : 실제 인증 처리, 유저 유효성 검증(패스워드 체크 등)
- UserDetailsService : 유저 객체 조회, UserDetails타입으로 반환

Provide manager
- 인증처리는 Provider에게 위임합니다.
먼저 매니저는 일을 시키는 사람 , 직접 작업하는 것은 provider라고 합니다. AuthenticationManager 는 interface이며 이를 구현한 기본 구현체는 ProviderManager입니다.
ProviderManager클래스 안에 authenticate()에서 WebSecurityConfigure 에서 등록했던 AuthenticationProvider들(즉 작업자)을 getProviders()로 받아와 for문을 실행하며 모두 일 시킨다.
AuthenticationProvider는 인터페이스이므로, 라꾸라꾸 프로젝트는 JWT 토큰을 사용해서 인증하기 때문에 이를JwtAuthenticationProvider 클래스로 구현했습니다. (여기서 Oauth와 같은 다양한 인증방법의 구현이 가능합니다)
- JwtAuthenticationToken은 Authentication의 구현체 클래스라고 할 수 있습니다.
Authorization
- 인가 : 접근이 허가된 권한을 갖는 사용자인지 입증하는 절차입니다.
- FilterSecurityInterceptor
- 필터 체인 마지막에 위치한 필터입니다.
- 인증된 사용자의 요청에 대해 승인/거부 여부를 최종적으로 결정
- 권한 처리는 AccessDecisionManager에 위임합니다.
인가결정 심의자
AccessDecisionManager
- 사용자의 자원접근 허용여부를 최종 결정하는 주체입니다.
- 여러 개의 Voter를 가지며 Voter들은 접근허용, 거부, 보류에 해당하는 각각의 값을 리턴한다.
'WEB > Spring' 카테고리의 다른 글
| [JPA] 7장 복합 키와 식별 관계 매핑 (0) | 2023.08.08 |
|---|---|
| [JPA] 2장 JPA 시작 (0) | 2023.05.22 |
| [JPA] JPA와 JPA의 필요성 (0) | 2023.02.26 |
| 빈 생명주기 콜백 (1) | 2022.09.11 |
| 같은 타입인 여러 개의 빈들을 조회하고 싶을 때 (1) | 2022.09.10 |


